
The Micro-Motion Protocol: Crafting Cinematic Portrait Cinemagraphs with AI Image-to-Video
Most AI-generated video looks chaotic because too many elements move at once. Learn the professional hybrid pipeline that combines precise image generation, targeted image-to-video motion control, and desktop masking to build high-fidelity living portraits.
Most AI-generated video looks chaotic because too many elements move simultaneously. When an image-to-video engine attempts to animate a scene without strict constraints, it often warps human anatomy, introduces unnatural camera drift, and destroys the subtle details that ground a shot in reality. In professional filmmaking, visual power is frequently a function of restraint—knowing exactly what should remain frozen to make the moving elements truly resonate.
At Montagea, we believe that high-end video production requires a deliberate blend of generative AI capabilities and traditional post-production control. The Micro-Motion Protocol is a hybrid pipeline designed to bypass the cheap, rubbery look of consumer mobile photo-animator apps. By generating a flawless static anchor frame, driving targeted micro-motions in an image-to-video (I2V) engine, and executing a precise desktop mask and loop, you can craft cinematic, high-fidelity living portraits that hold up on a theater screen.
Beyond the App Preset: The Anatomy of a Cinematic AI Cinemagraph
Consumer-grade "photo animator" apps operate on automated optical flow algorithms that warp an entire image. When applied to a portrait, these tools stretch the subject's skin, distort facial features, and cause the eyes to drift in a deeply unsettling, uncanny way. A professional cinemagraph, by contrast, relies on absolute spatial isolation. The viewer's brain is highly sensitive to micro-movements in human faces; even a one-pixel shift in a cheekbone or nose during an animation sequence breaks the illusion of reality.
To achieve a gallery-grade cinemagraph, your workflow must respect the three pillars of micro-motion synthesis:
- Absolute Structural Stillness: The core subject—particularly the face, skull, and shoulders—must remain completely static, locked to a single, unyielding frame.
- Organic Micro-Motion: Only highly fluid, secondary elements should move. Think of wind gently rustling thin strands of hair, steam rising from a coffee cup, embers floating from a fire, or rain falling in a shallow depth-of-field background.
- A Mathematically Seamless Loop: The motion must cycle without a visible jump cut, fade-to-black, or abrupt speed ramp, creating the illusion of suspended, infinite time.
The Montagea hybrid pipeline achieves this by decoupling generation from animation. Instead of asking a single AI model to output a perfect, looping video from scratch, we use the AI engine to generate raw motion assets, then use professional desktop compositing tools to mask, lock, and loop the final plate.
Step 1: Generating the Anchor Image for Perfect Continuity
The foundation of any great cinemagraph is the static frame, or the "anchor image." When generating your base image in Midjourney or DALL-E 3, you must design the composition with separation in mind. You want a clear visual distinction between the elements that will remain static and those that will move.
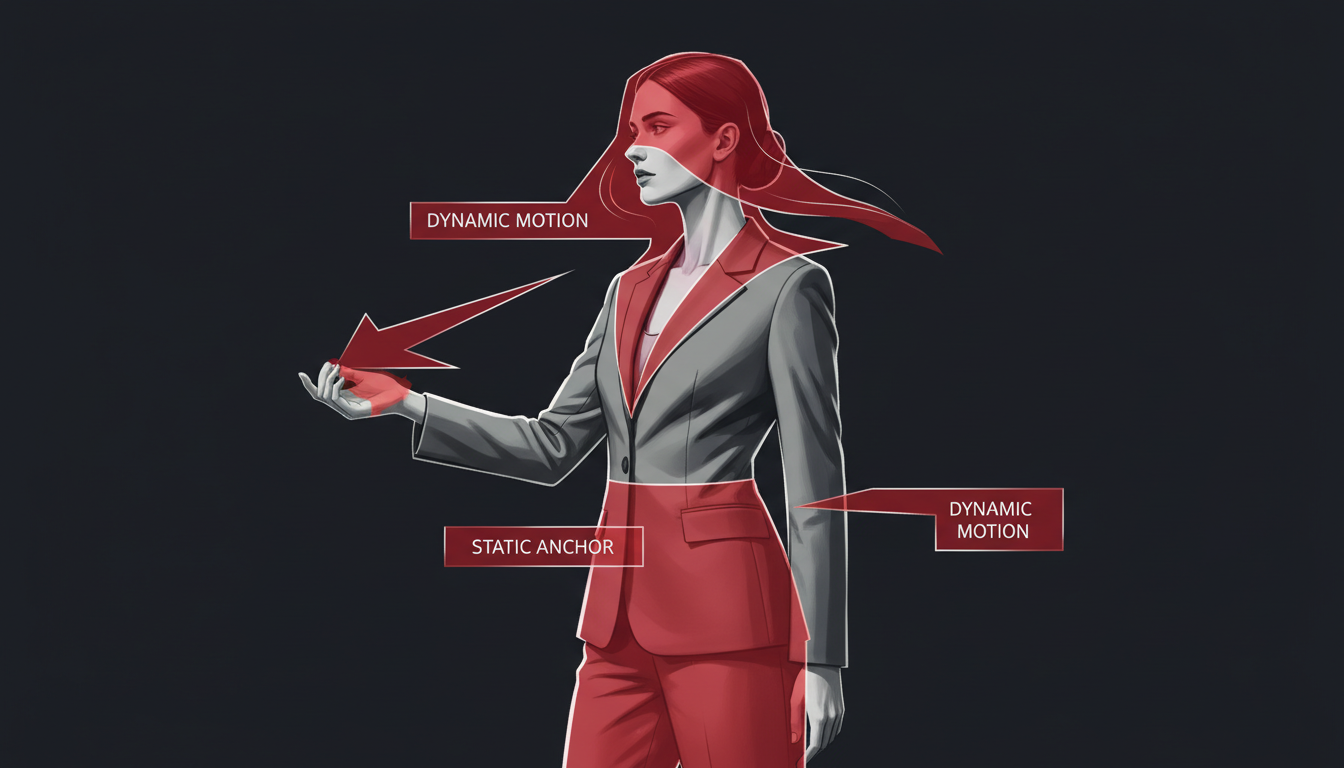
When prompting, avoid words that imply active motion blur, such as "speeding rain" or "wind-whipped hair." These terms bake motion artifacts into your source frame, resulting in blurry, smeared textures that look incredibly messy when animated. Instead, prompt for crisp, high-shutter-speed details. For example, use terms like "frozen water droplets," "highly detailed individual hair strands," or "crisp steam plumes." High-contrast lighting and rich textures—like wet asphalt, velvet, reflective glass, or metallic surfaces—create sharp, clean edges that make the subsequent masking stage significantly easier.
To dive deeper into maintaining facial structure and features across your AI video pipeline, check out our guide on the Character Anchor Protocol. Ensuring your subject's structural integrity remains flawless from the very first frame prevents downstream compositing errors.
Step 2: Driving Micro-Motion with Image-to-Video Engines
Once you have your high-resolution anchor image, upload it into an advanced image-to-video (I2V) engine such as Kling AI, Runway Gen-3, or Luma Dream Machine. The goal here is not to create a dynamic action scene, but to generate organic, subtle physical movement while keeping the camera completely locked off.
Structuring the Motion Prompts
Your text prompt in the I2V engine must be highly descriptive of the secondary motion, while explicitly commanding stillness for the primary subject. For a comprehensive breakdown of controlling physics and camera dynamics in image-to-video engines, explore the Kinetic Product Protocol.
A highly effective motion-driving prompt structure looks like this:
"Static camera, zero camera movement. The subject remains completely still, frozen in time. Subtle wind gently rustles only the loose strands of her hair. Soft, rising steam drifts slowly from the cup in the foreground. High-fidelity physics, realistic fluid dynamics."
If your AI video tool supports brush-based motion targeting (such as Runway's Motion Brush or Kling's motion path tool), paint over only the areas you want to move—such as the tips of the hair, the background rain, or the rising steam. Keep the motion weight low (typically 2 or 3 on a scale of 10). If the motion weight is set too high, the AI engine will attempt to animate the head, neck, and shoulders, warping the underlying skeletal structure and ruining the shot's realism.
Step 3: The Masking and Looping Pipeline in Post-Production
Export a high-bitrate (preferably ProRes or high-quality H.264/H.265) 4-to-5 second clip from your AI generator. Now, bring both your original, ultra-sharp static anchor image and the AI-generated video clip into After Effects, Premiere Pro, or DaVinci Resolve. This is where we lock down the frame and eliminate any residual AI drift.
Place the static anchor image on Video Track 2 (the top layer) and the AI-generated video clip on Video Track 1 (the bottom layer). Using a precise vector pen tool, draw a mask on the top static layer around the subject's face, neck, and eyes. Feather the mask edges by 15 to 25 pixels to create a seamless transition. By doing this, you are carving a hole in the static layer to let the moving hair or background from the AI video layer show through, while keeping the critical facial features completely locked to the unmoving static frame.
To turn this composite into an infinite, seamless loop, use the classic "Cut, Shift, and Crossfade" technique:
- Take your 4-second composite sequence and slice it exactly in half, creating Clip A (0:00 to 2:00) and Clip B (2:00 to 4:00).
- Swap their positions on the timeline: place Clip B first, followed immediately by Clip A. Your edit point in the middle is now perfectly continuous because it was the original seam. However, the very beginning and the very end of your timeline now have a harsh jump cut.
- To resolve this, overlap the new seam in the middle by about 15 to 20 frames.
- Apply a standard linear crossfade (opacity dissolve) over this overlap area. Because the motion is subtle and organic, the two halves will blend seamlessly, creating a mathematically perfect loop where the end of the video matches the beginning frame down to the pixel.
The Hybrid Workflow vs. Pure AI Generation
While some creators attempt to prompt a perfect, looping cinemagraph directly out of an AI video generator, this approach rarely succeeds in professional environments. The table below highlights why a hybrid workflow remains superior for high-end commercial and artistic projects.
| Parameter | Pure AI Video Generation | Montagea Hybrid Pipeline |
|---|---|---|
| Facial Fidelity | Low to Moderate. Face often drifts, eyes blink unnaturally, or features warp over time. | Absolute. The face is masked to a static, high-resolution source frame. |
| Spatial Control | Minimal. The AI decides which parts of the frame move, often leading to unwanted background warping. | Precise. You paint and mask exactly which pixels are allowed to move. |
| Loop Seamlessness | Inconsistent. Often requires multiple expensive re-rolls to find a clip that doesn't jump. | Flawless. Guaranteed by the desktop "Cut, Shift, and Crossfade" post-production technique. |
| Render Time & Cost | High. Dozens of generations needed to get a single usable, stable shot. | Low. Requires only 1 or 2 good motion passes, saving computational credits. |
Choose the pure AI approach only when rapid prototyping or storyboarding is the primary goal. For client-facing commercial work, fashion editorials, or digital art installations, the hybrid pipeline is the only way to guarantee the visual precision and pixel-level control that agencies and collectors expect.
Troubleshooting Common AI Cinemagraph Artifacts
Even with a rigorous hybrid workflow, you may encounter specific visual bugs unique to AI video synthesis. Here is how to diagnose and resolve them in post-production:
1. Edge Bleeding and Silhouette Warping
Sometimes, the motion of the background (like falling snow or passing car headlights) will warp the silhouette of your static subject, making their shoulders or hair look like they are melting. To fix this, create a clean duplicate of your static subject using After Effects' Rotobrush or manual masking. Place this clean cutout on the top layer, sandwiching the moving background layer between your clean foreground subject and your background plates. This completely hides any edge bleeding behind the sharp, masked boundaries of your subject.
2. Lighting Mismatches and Static Shadows
If your background features a dynamic light source—such as a flickering neon sign or passing police lights—but your static subject's face remains perfectly, statically lit, the illusion breaks immediately. To master how light decays and reflects across moving elements in AI video, refer to our walkthrough of the Luminance Vector Protocol. You can also manually solve this in post-production by adding an adjustment layer over your static face mask and keyframing subtle exposure and color temperature shifts that match the timing of the background light fluctuations.
3. Textural Discontinuity
AI video engines often compress or soften textures compared to high-resolution static images, creating a noticeable drop in sharpness between your static masked face and the moving hair or background. To unify the composite, apply a subtle adjustment layer over the entire final edit. Add a very fine, monochromatic digital film grain (around 1% to 2% intensity). This uniform texture overlay acts as a visual glue, masking the difference in resolution and giving the final loop a cohesive, cinematic film finish.
How do I stop eyes from blinking or drifting in an AI cinemagraph?
The most reliable way to prevent eye movement, blinking, or drifting is to use a hybrid masking workflow. In your video editing software (like Premiere or After Effects), place your static high-resolution image on the layer above your AI-animated video. Mask out the eyes and face on the static layer, allowing only the background or hair from the video layer below to show through. This keeps the eyes completely frozen and sharp.
What is the best AI video generator for making cinemagraphs?
Runway Gen-3 Alpha and Kling AI are currently the best tools for cinemagraph creation because they offer advanced motion brushes and highly responsive image-to-video (I2V) engines. These features allow you to isolate and paint specific areas for motion while keeping the rest of the frame completely still.
How do you make an AI video loop seamlessly without a visible jump cut?
Use the "Cut, Shift, and Crossfade" method. Split your AI video clip in half, swap the positions of the two halves on your editing timeline so the original beginning and end meet in the middle, overlap them by a few frames, and apply a smooth crossfade transition over the seam. This ensures the start and end frames of your loop are identical.
Can I create a cinemagraph using only free AI tools?
Yes, you can generate your base image with free tiers of platforms like DALL-E 3 (via Bing Image Creator) or Leonardo.ai, animate it using free daily credits on Kling AI or Luma Dream Machine, and perform the masking and looping in free editing software like CapCut Desktop or DaVinci Resolve (free version).



