
How to Maintain the 180-Degree Rule in AI Video Production
AI video generators lack spatial awareness, often flipping characters and breaking continuity. By using precise screen-side prompts, image-to-video anchors, and structured assembly checks, filmmakers can lock the axis of action.
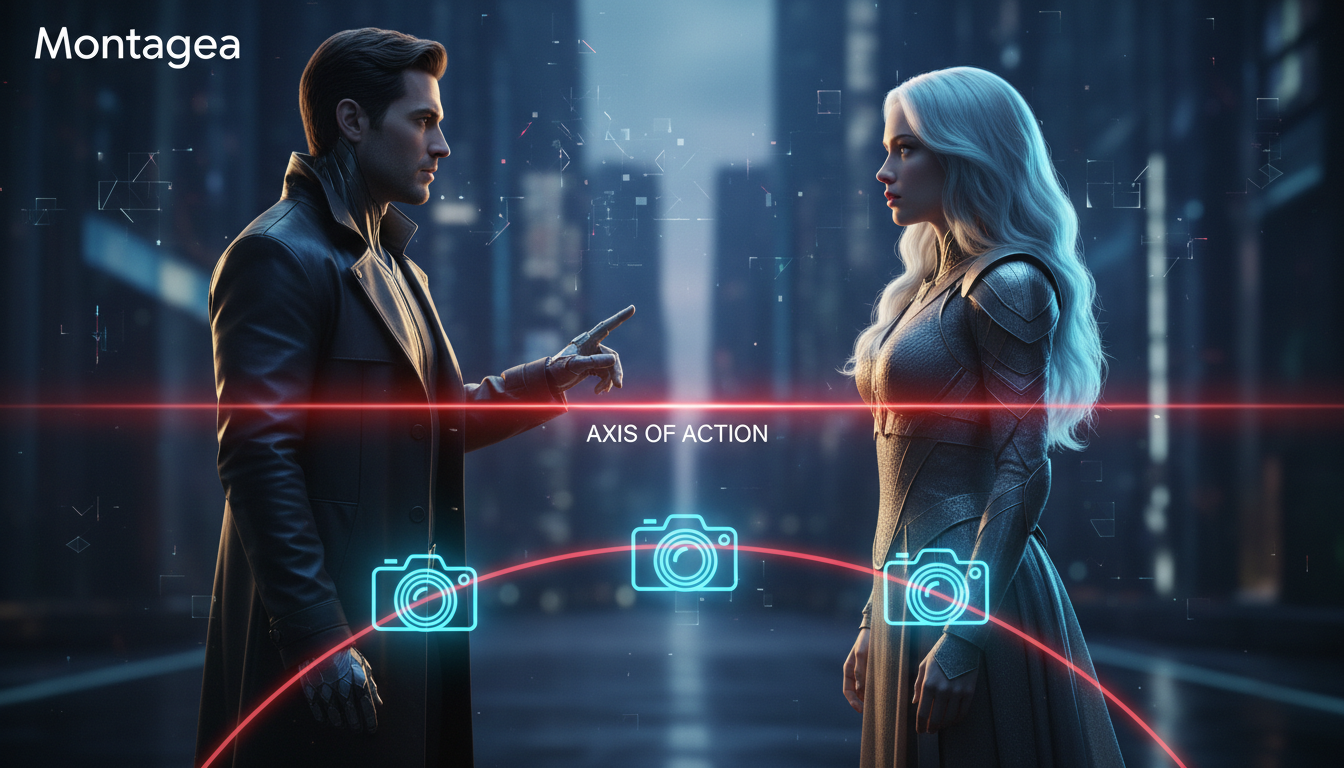
To maintain the 180-degree rule in AI video production, you must manually define and enforce the axis of action through precise screen-side coordinates, image-to-video (I2V) keyframe anchoring, and systematic scene reviews. Because current generative AI models lack a persistent 3D understanding of a physical set, they render each shot in absolute isolation. Without explicit constraints, models will frequently flip character positions and eye-lines, disorienting your audience during dialogue sequences.
The Spatial Blind Spot of AI Video Generators
The 180-degree rule is a fundamental tenet of cinematography. By drawing an imaginary line—the axis of action—between two interacting characters, filmmakers ensure that the camera remains on one side of that line. This keeps Character A consistently on the left side of the screen looking right, and Character B on the right side looking left. When editing these shots together, the audience retains a clear mental map of the physical space.
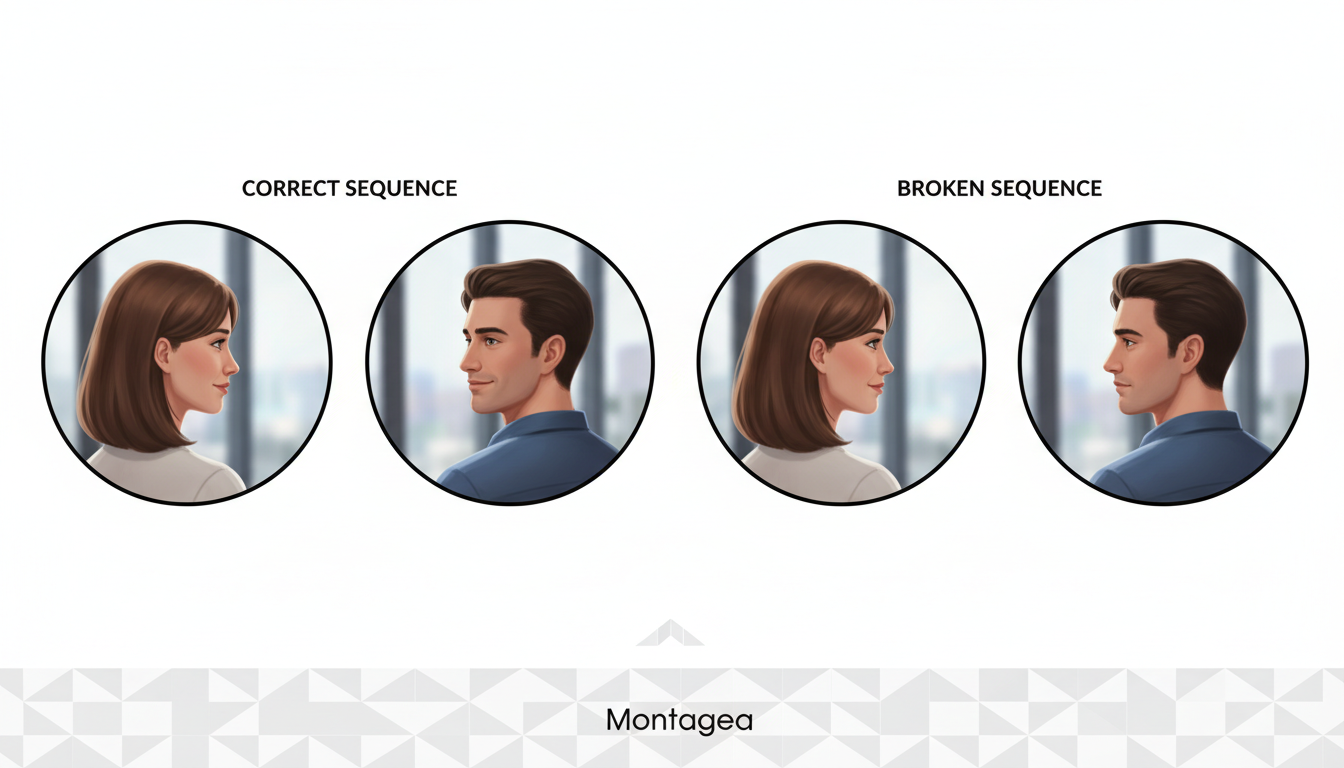
AI video generators have a massive spatial blind spot: they generate clips frame-by-frame with no inherent memory of previous shots or the broader physical environment. If you prompt a medium shot of a character looking right, and then prompt a close-up of the same character, the AI has no historical context to know that the character should still be looking right. It treats each prompt as a blank slate. This often results in a jarring continuity error where characters appear to be looking in the same direction rather than at each other, instantly breaking the viewer's immersion.
Prompting Strategies to Lock the Axis of Action
To force an AI video model to respect the axis of action, you must replace vague descriptive language with precise, coordinate-based staging prompts. Do not rely on the engine to guess where characters are looking; dictate their screen-side positions explicitly.
For dialogue scenes, structure your prompts to define both the character's screen position and their eye-line direction. For example, instead of prompting "A close-up of a detective talking," use: "A medium close-up of a detective, positioned on screen-left, looking toward screen-right in profile, talking to someone off-camera." For the opposing shot, write: "A medium close-up of a suspect, positioned on screen-right, looking toward screen-left in profile."
It is also critical to avoid ambiguous camera movement prompts. If you ask for a dynamic camera sweep, the model may swing across the invisible 180-degree line. You must contrast the rigid boundaries of the 180-degree rule with the fluid spatial challenges of prompting cinematic 360-degree orbit shots. While orbit shots are excellent for solo characters or stylized transitions, they will destroy spatial orientation in a standard dialogue scene. Keep your camera prompts restricted to stable pans, tilts, or subtle push-ins that remain strictly on one side of the axis. Furthermore, when blocking movement within the frame, ensure you are prompting clean character entries and exits that respect the screen-side boundaries so characters do not cross the established line when moving through the frame.
Using Image-to-Video (I2V) as a Spatial Anchor
Relying solely on text-to-video (T2V) prompts for dialogue scenes is highly inefficient and prone to spatial drift. A more reliable workflow uses Image-to-Video (I2V) as a spatial anchor. By establishing the exact visual layout in a static image first, you lock the spatial relationship between characters and the camera before any motion is rendered.
To execute this workflow, generate or composite your keyframes first using an image generator or a layout tool like Photoshop. When preparing these keyframes, aim to align the characters' eye-lines, shoulder placements, and background elements across your over-the-shoulder and close-up setups to establish a consistent spatial relationship. Once these keyframes are established, feed them into your chosen AI video engine (such as Kling, WAN, or Runway) to generate the motion. Keep the motion strength low to prevent the engine from drifting across the established axis or warping the background perspective. This method ensures that even if the AI introduces subtle movement, the foundational camera angle remains locked to the correct side of the line.
The Dialogue Axis Review Checklist for Scene Assembly
When assembling your scene, you must systematically review every generated shot for spatial continuity. On collaborative platforms like Montagea, where multiple contributors might render different shots within the same scene using various engines, clear guidelines are essential to prevent mismatched angles.
To streamline this process, integrate these spatial checks directly into your team's AI video scene approval workflow:
| Checklist Item | Verification Criteria | Fix / Solution |
|---|---|---|
| Eye-Line Match | Does Character A's gaze line up with Character B's position? (e.g., Left-to-Right matches Right-to-Left) | Re-render with explicit gaze coordinates or mirror the shot. |
| Shoulder Placement | In over-the-shoulder (OTS) shots, is the foreground shoulder on the correct side of the frame? | Flip the image reference before rendering, or flip the output video. |
| Background Consistency | Does the background perspective match the established camera side of the line? | Use I2V with a consistent environment plate to anchor the background. |
If you discover a broken axis during assembly, you have two primary post-production fixes. First, if the background contains no readable text, asymmetrical details, or directional lighting, you can horizontally flip the video clip in your editing software to correct the screen direction. Second, you can insert a neutral cutaway shot—such as a close-up of an object on the table, a wide shot directly on the line of action, or a cutaway to an environmental detail. This neutral shot resets the audience's spatial orientation, allowing you to establish a new 180-degree line on the subsequent shot.
Can I use a master shot to force the AI model to remember the 180-degree line?
No. Because AI video generators do not have a persistent 3D model of your scene, they cannot reference a master shot to maintain spatial continuity in subsequent close-ups. You must manually enforce the spatial relationships established in your master shot by using specific coordinate prompts and matching image-to-video references for every individual angle.
What should I do if a generated shot is perfect but the character is looking the wrong way?
If the background is neutral and has no text, directional light sources, or distinct asymmetrical features, you can simply apply a horizontal flip (mirror effect) in your non-linear editor (NLE). If flipping the shot creates background inconsistencies, you will need to re-render the shot with explicit screen-side coordinates in the prompt.
Do different AI video engines handle spatial continuity better than others?
While some advanced engines offer better prompt adherence, no current AI video engine possesses native spatial continuity memory across separate generations. The key to consistency lies in your workflow—specifically using Image-to-Video (I2V) to anchor the spatial layout before generating motion, regardless of the engine you use.



