
Script-to-Panel: Building a Cinematic AI Storyboarding Pipeline from Your Short Film Screenplay
Learn how to systematically translate a formatted screenplay into a visually consistent, cinematic AI-generated storyboard. This step-by-step pipeline bridges the gap between written script pages and production-ready visual pre-visualization.
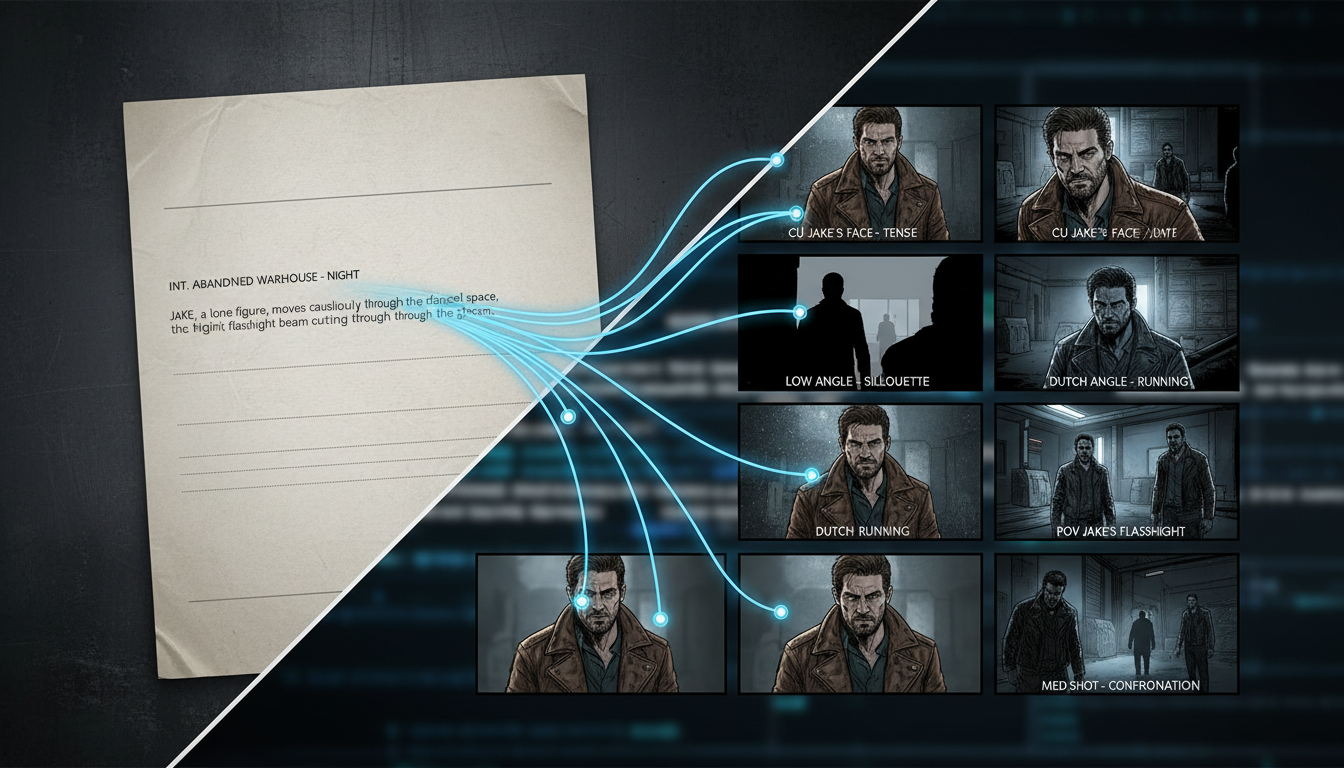
Translating a screenplay into a cohesive storyboard has historically required weeks of manual sketching or expensive pre-visualization software. Today, generative AI tools can produce stunning imagery in seconds, yet filmmakers frequently struggle to turn these tools into a reliable, production-ready pipeline. The issue is not the image generator's rendering capability, but rather the translation gap between the literary grammar of a script and the spatial, technical language of an AI model.
To build a reliable script-to-panel pipeline, filmmakers must stop treating AI image generation as a creative lottery. Instead, you need a systematic method for converting screenplay sluglines, action beats, and subtext into highly structured visual metadata. This guide outlines a technical, step-by-step framework to bridge this gap, ensuring your AI-generated storyboards maintain strict character continuity, spatial logic, and cinematic intent.
The Script-to-Panel Translation Gap (and How to Bridge It)
The most common mistake filmmakers make when using AI generators is copy-pasting standard screenplay action lines directly into prompt boxes. Screenplays are written to evoke emotion in actors, direct the crew, and maintain a literary flow. A line like “John stares at the empty chair, the crushing weight of his isolation finally breaking him” is excellent for an actor. However, to a spatial rendering engine, terms like “crushing weight” and “isolation” are abstract, leading to chaotic, non-cinematic, and wildly inconsistent frames.
To bridge this gap, you must translate literary description into visual prompting. This means converting internal emotional states into physical camera distances, lighting styles, and subject positioning. Before generating a single panel, you must also establish a “Visual Bible” for your project. This upfront specification defines your aspect ratio (such as 2.39:1 anamorphic), your color grading palette (for example, desaturated blues and warm ambers), and your camera lens profile (like a 35mm prime). By locking these parameters in your base prompt templates, you prevent the AI from shifting styles between panels, ensuring a unified visual language throughout your pre-production phase.
Step 1: Deconstructing the Screenplay into Visual Metadata
A systematic breakdown is the only way to convert a raw script page into structured prompts. You must isolate three core components from every scene: the environmental setting (derived from the slugline), the precise character positioning within the space, and the dramatic action or subtext. Each of these elements maps directly to a technical parameter in your image generation tool.
Translating emotional beats into camera distances is key to this process. A moment of intense internal tension should not be prompted with emotional adjectives; instead, translate it into an extreme close-up prompt that focuses on physical micro-expressions, tight depth of field, and high-contrast lighting. Conversely, a moment of isolation is best served by an extreme wide shot where the subject is dwarfed by their environment. By systematically stripping away literary prose and replacing it with physical camera directives, you regain control over the visual narrative.
The Scene Breakdown Framework
To streamline this translation process, use a structured framework that maps screenplay lines directly to cinematic prompts. This ensures the generator prioritizes physical cinematography over generic digital art styles.
| Screenplay Line | Cinematic Prompt Translation | Camera/Lighting Directives |
|---|---|---|
| “Sarah waits in the dark hallway, terrified of what is behind the door.” | Medium close-up shot of a 28-year-old woman, wide eyes, sweating, standing in a narrow dark hallway. | Low-key lighting, volumetric shadows, 50mm lens, f/2.0, shallow depth of field, cool blue color grading. |
| “The two rivals face off in the middle of the crowded market.” | Wide shot showing two men standing 10 feet apart, facing each other, surrounded by a blurred, bustling marketplace. | Low-angle shot, 35mm anamorphic lens, warm golden hour backlighting, high-contrast, cinematic film grain. |
| “He realizes the document is missing and panics.” | Extreme close-up of a man's hands frantically shuffling through empty manila folders on a wooden desk. | Top-down angle, macro lens, harsh overhead fluorescent light, shallow depth of field. |
When formatting your final prompts, always use a structured syntax formula to maintain consistency across your entire storyboard:
[Subject/Action] + [Setting/Context] + [Camera Angle & Shot Type] + [Lens & Optical Physics] + [Lighting & Color Palette] + [Aspect Ratio/Style Modifiers]
The Visual Pre-Production Checklist
- Isolate the Subject: Clearly define who or what is the focal point of the panel.
- Define the Framing: Specify the exact shot size (e.g., ECU, CU, MCU, MS, WS).
- Determine Camera Angle: Choose eye-level, low-angle, high-angle, or Dutch angle to match the emotional subtext.
- Map the Lighting: Define the light source, quality (soft/harsh), and style (e.g., chiaroscuro, high-key, low-key).
- Establish Lens & Depth: Lock in focal lengths (e.g., 85mm prime) and aperture settings to control background blur.
Maintaining Character and Spatial Continuity Across Panels
The single greatest challenge in AI-assisted filmmaking is keeping characters and environments consistent across multiple storyboard frames. If your lead actor has a different facial structure, hair color, or wardrobe in every panel, the storyboard fails as a functional blueprint. To combat this, you must construct character reference sheets and use highly specific, unvarying physical descriptors (e.g., “a 40-year-old detective with a sharp jawline, short salt-and-pepper hair, wearing a dark gray trench coat”) rather than generic names or simple descriptions. Combining these detailed descriptors with seed locking and image-to-image reference tools will anchor your character's likeness.
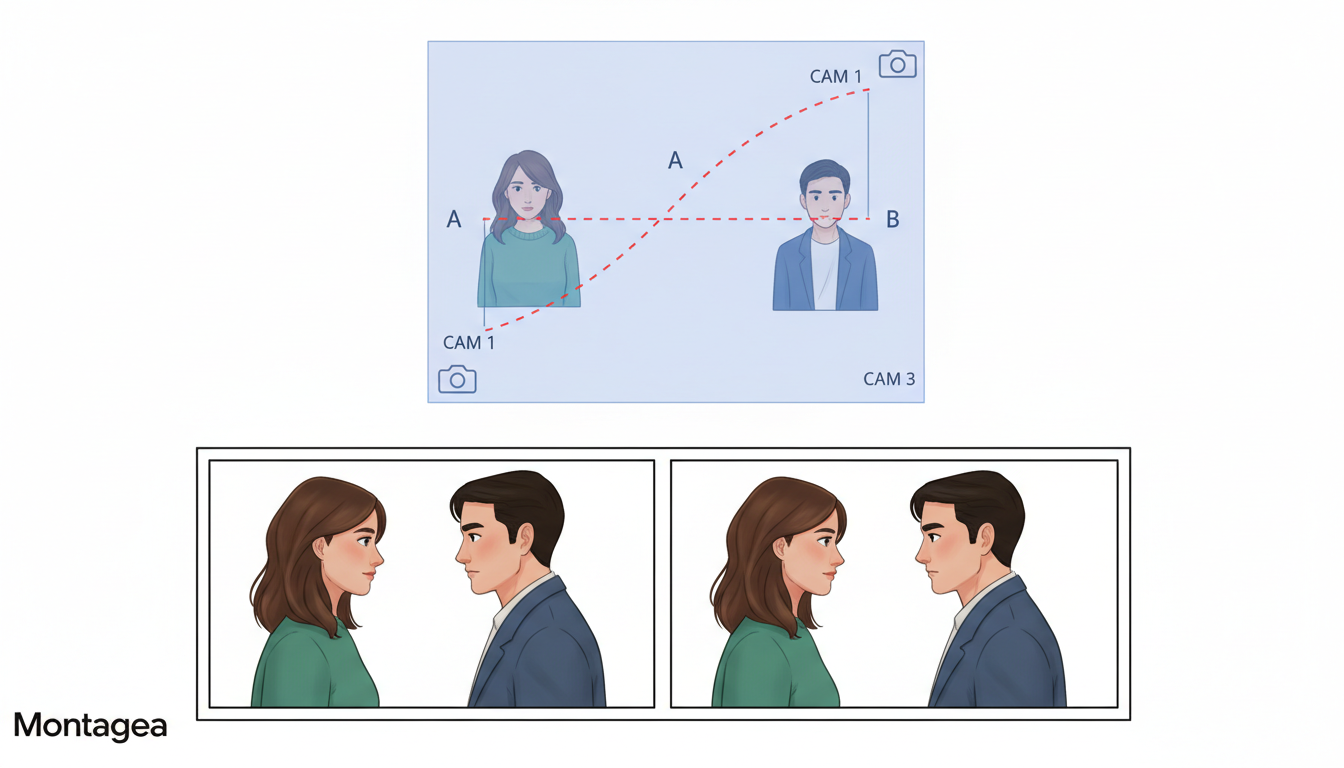
Spatial logic is equally critical. To prevent visual confusion, your prompts must enforce the 180-degree rule. If Character A is on the left looking right, and Character B is on the right looking left, your prompts must explicitly state these spatial relationships in every over-the-shoulder and reverse-angle shot (e.g., “Over-the-shoulder shot looking past Character A on the left towards Character B on the right”). Once you have established these static, spatially accurate frames, you can transition these static assets into motion using a dedicated storyboard-to-motion pipeline to maintain temporal continuity, turning your storyboard into a dynamic pre-visualization reel.
Prompting for Camera Language: From Lenses to Lighting
To achieve a truly cinematic aesthetic, you must replace generic buzzwords like “photorealistic” or “hyperrealistic” with actual camera parameters and optical physics. AI engines respond exceptionally well to real-world photography terms. Specifying a “35mm anamorphic lens, shallow depth of field, f/1.8” tells the rendering engine exactly how to handle background compression, edge distortion, and bokeh, resulting in a much more authentic film look than generic quality descriptors.
Lighting is your primary tool for translating a script's subtext into visual mood. Instead of prompting for “scary lighting,” use technical terms like “low-key, high-contrast chiaroscuro lighting with sharp key light and deep volumetric shadows.” For action scenes, you can choreograph complex, high-velocity shots by incorporating camera sweep and kinetic motion cues into the prompt, directing the AI to render motion blur, camera shakes, and dynamic tracking angles that mimic real physical camera rigs.
The Montagea Method: Integrating AI Storyboards into Your Production Workflow
At Montagea, we view the storyboard not as a static reference, but as the foundational blueprint for the entire AI-assisted video pipeline. Once you have generated your sequence of highly consistent, cinematically accurate storyboard panels, the next step is to bring them into a non-linear editor to build a timed animatic. By importing your AI panels into a timeline, adding temporary scratch dialogue, sound effects, and a temp music track, you can begin testing the pacing of your short film long before production begins.
This systematic pipeline ensures that your creative vision remains fully intact from script to final render. By using your finalized storyboard panels as direct image-to-image or ControlNet inputs for your final AI video generation, you eliminate creative drift. The precise compositions, lighting schemes, and character blockings you established in your storyboard panels carry directly over into your moving footage, establishing a highly efficient, professional, and repeatable pre-production workflow for modern filmmakers.
How do I maintain character consistency across different AI storyboard panels?
To maintain character consistency, avoid generic names or simple descriptions. Create a highly detailed physical profile for your character (including age, facial structure, hair color/style, and specific wardrobe items) and reuse this exact text block in every prompt. Additionally, utilize image-to-image reference features, character consistency models, and keep seed numbers locked when generating sequential panels.
Can I upload a standard screenwriting format like Final Draft directly into AI storyboarding tools?
While some specialized AI storyboarding platforms allow direct script uploads, standard image generators require you to manually break down your script. It is highly recommended to extract the key action lines and translate them into structured visual prompts using our Scene Breakdown Framework before inputting them into any AI tool.
What are the best camera prompt keywords for realistic cinematic lighting in a storyboard?
Ditch generic terms like "good lighting" or "photorealistic." Instead, use precise industry terms such as "chiaroscuro," "low-key high-contrast lighting," "volumetric dust motes," "rim lighting," "golden hour backlighting," or "soft diffuse key light from a single window." Specifying lens types like "35mm anamorphic" also naturally improves how the AI renders light and bokeh.
How do I turn my static AI storyboards into a moving animatic with sound?
Export your generated storyboard panels and import them into a video editing software timeline (such as Premiere Pro, DaVinci Resolve, or CapCut). Lay down your screenplay's dialogue using scratch audio or voiceover generators, add temporary sound effects, and adjust the duration of each panel to match the dramatic pacing of the scene.



