
How to Plan Pickup Shots for an AI Short Film
Discover how to identify visual gaps in your AI short film and generate precise, surgical pickup shots. This guide covers the AI pickup decision matrix, prompt structures for continuity, and collaborative workflows to protect your render budgets.
Planning pickup shots for an AI short film involves identifying narrative gaps, pacing drags, or continuity errors in your rough cut and generating targeted, short clips—such as close-up inserts, reaction shots, or establishing views—rather than re-rendering entire sequences. While highly efficient for preserving compute budgets, the success of an AI pickup depends on matching the precise lighting, lens characteristics, and asset details of the surrounding footage. By treating pickups as a deliberate phase of post-production rather than an emergency fix, creators can correct visual inconsistencies and smooth out rough edits without wasting valuable generation credits.
The AI Pickup Shot: Resolving Edit Gaps Without Re-rendering Scenes
In traditional filmmaking, a pickup shot is a small camera setup filmed after primary production has wrapped, usually to capture a missed line, a close-up of a prop, or a reaction. It requires rescheduling crew, rebuilding sets, and matching lighting from weeks prior. In AI filmmaking, the physical hurdles disappear, but the challenge of visual consistency remains. Instead of rebuilding a physical set, an AI pickup requires reconstructing the prompt parameters, seeds, and image references of a previous generation.
Many creators make the mistake of re-rendering whole multi-character sequences when a minor continuity error occurs, such as a character's clothing changing color or a background object shifting. This approach is incredibly expensive and time-consuming. Generating a single, targeted 3-second insert or reaction shot to mask the error is far more efficient. It allows you to hide prompt-drift, fix pacing issues, and bridge narrative gaps with surgical precision.
For creators working within tight constraints, such as those following The 30-Second AI Film Blueprint, every single shot must carry narrative weight. When a transition feels jarring or a visual beat is missing, a strategic pickup shot can save the edit. To execute this effectively, you must understand the three primary categories of AI pickups:
- Inserts: Tight close-ups of props, hands, or environmental details that focus the viewer's attention and break up visual monotony.
- Reactions: Close-ups of a character's facial expression, which are excellent for masking lip-sync errors, covering abrupt cuts, or adding emotional punctuation.
- Establishing Pickups: Wide shots of a location or building used to re-anchor the scene's geography, especially when character motion in primary shots becomes too chaotic.
By using these targeted categories, editors can protect their compute budgets and seamlessly integrate pickups into a broader multi-model pipeline. This strategy ensures that expensive, high-fidelity models are reserved for critical action, while fast, specialized models handle quick transition pieces.
The AI Pickup Decision Matrix: Diagnosing the Edit Gap
When you sit down to review your rough cut, you will inevitably find moments where the visual flow breaks. Rather than guessing how to fix these gaps, you can use a structured decision framework to determine the exact type of pickup shot required, bridging the gap between your initial script-to-panel storyboarding pipeline and the final edit.
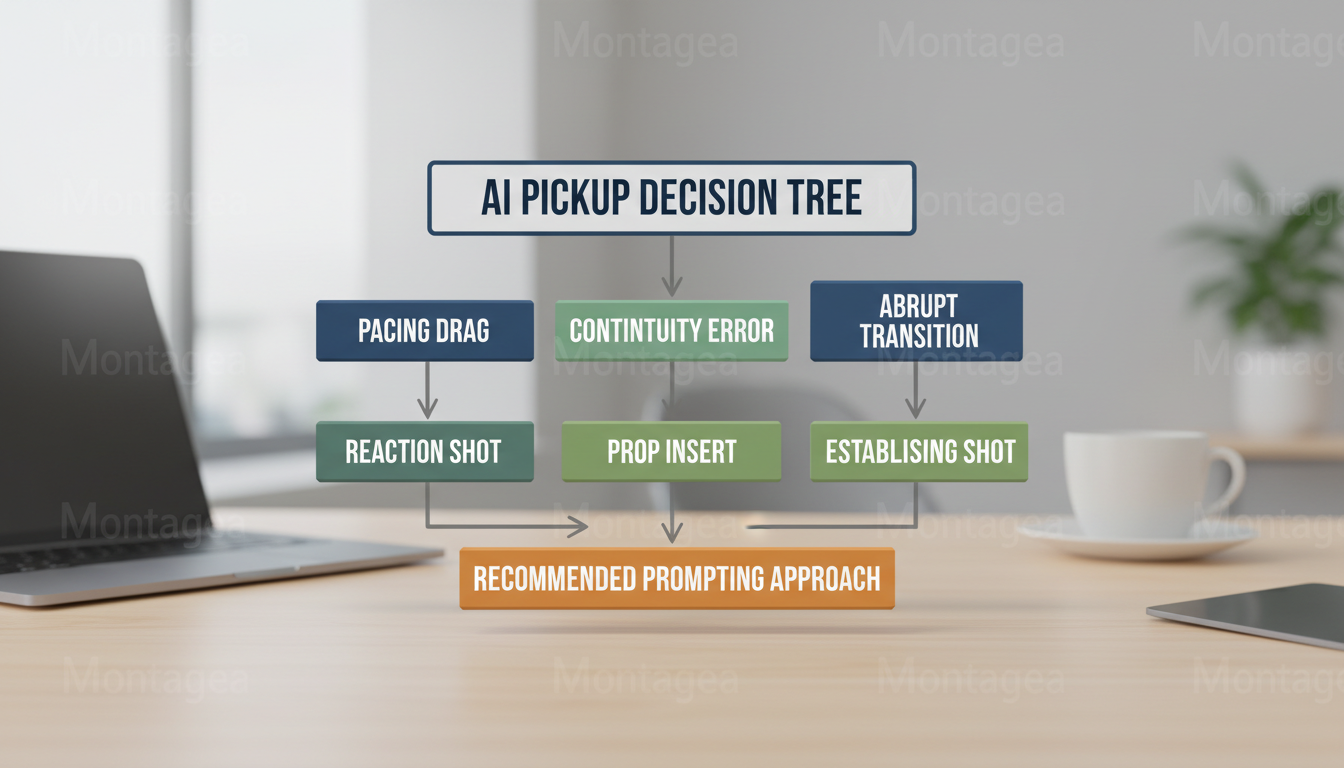
The following table outlines common editing issues and matches them with their corresponding AI pickup solutions and prompt strategies:
| Editing Problem | Root Cause | Recommended Pickup | Prompting Strategy |
|---|---|---|---|
| Abrupt character jump cut | Character shifted positions drastically between generation prompts. | Reaction Shot (Close-up) | Image-to-video using the character's face from the previous shot, focusing on a subtle head turn or blink. |
| Unexplained prop appearance | A crucial item is suddenly in a character's hand without introduction. | Prop Insert (Extreme Close-up) | Text-to-video or image-to-video showing hands picking up or interacting with the object against a neutral background. |
| Pacing feels flat or rushed | No emotional pause or beat between dialogue or action beats. | Atmospheric B-Roll / Establishing | Slow panning shot of the environment, dust motes in light, or wind blowing through trees. |
A Concrete Continuity Scenario: The Drifting Jade Pendant
Consider an illustrative scenario where a character is holding a jade pendant. In Shot A, the pendant is a detailed, teardrop-shaped piece of jade. In Shot B, the pendant drifts into a circular, flat disc. Cutting directly between these two shots highlights the continuity error immediately.
Instead of re-rendering both complex multi-character shots, you can generate a 2-second close-up insert of the pendant resting on a wooden table or being gripped tightly in a hand. By using a high-quality reference image of the teardrop pendant for an image-to-video render, you establish a strong visual anchor. In the edit, you cut from Shot A to the tight insert, and then to Shot B. The close-up resets the viewer's spatial expectations, smoothing over the transition and making the variation in the wider shots far less noticeable.
Choosing Between Image-to-Video and Text-to-Video
When generating pickups, your choice of input method determines your control over continuity:
- Use Image-to-Video (I2V) when structural and asset consistency is paramount. For example, if you need a reaction shot of a specific character, feed a clean frame from primary footage into the generator. This anchors the character's features, limiting the AI to animating expressions rather than inventing a new face.
- Use Text-to-Video (T2V) when you need dynamic physics or environmental action where exact asset matching is secondary. Examples include a glass shattering on the floor, a door slamming shut, or shadows moving across a wall to build tension.
Coordinating and Prompting Pickups Across a Collaborative Crew
Managing pickup shots in a collaborative environment requires clear communication and organized division of labor. If you are working with a distributed team of prompt engineers and editors, you cannot simply ask for "a fix"—you must provide highly specific visual targets.
To begin, you should apply a systematic script-splitting protocol to your pickup list. Break down the edit gaps into discrete scene briefs, noting the exact frame dimensions, lighting conditions, and camera angles of the surrounding shots, while keeping the crew aligned with a three-point async update.
On Montagea, this collaborative workflow is built directly into the platform's architecture. Because Montagea operates as a co-creation hub where you split stories into scenes and invite a crew, you can easily isolate edit gaps, create them as "Open Scenes," and assign them to contributors. Crew members can then claim these scenes and render them using the best engine for that specific visual task—choosing from available engines on the platform such as Kling, WAN, or Google Veo depending on the shot's specific requirements.
To ensure the submitted renders match your existing timeline, you must translate editorial feedback into actionable prompt adjustments. Avoid vague cinematic critiques like "make it feel more moody." Instead, write precise instructions that address the technical parameters of the AI model:
- Specify the Lens and Camera Motion: "85mm anamorphic lens, shallow depth of field, slow camera push-in, matching the soft focus of Scene 3."
- Define the Lighting and Color Profile: "Warm 3200K key light from screen left, deep shadows on screen right, matching the low-key golden hour lighting of the master shot."
- Provide Seed and Reference Controls: Supply the exact seed numbers, character reference images, and motion weight settings used in the adjacent clips to prevent style drift.
By organizing your pickup production as a structured phase of your post-production workflow, you can quickly patch narrative holes, maintain strict character and prop consistency, and complete your AI short film with minimal waste of compute resources.
How do I maintain lighting and color consistency in an AI pickup shot?
To maintain lighting consistency, explicitly define the light source direction, color temperature (e.g., "3200K warm light"), and style (e.g., "high-contrast film noir") in your text prompt. Additionally, use an image-to-video workflow using a color-graded reference frame from the adjacent shot to guide the generator's color palette.
Should I use image-to-video or text-to-video for generating close-up insert pickups?
Use image-to-video when the insert features a specific, complex prop or character asset that must match previous scenes exactly. Use text-to-video for generic atmospheric elements, physics-heavy actions (like water splashing), or environmental details where exact structural matching is not required.
How do I prevent character face-drift when rendering reaction pickups?
Prevent face-drift by using a clean, high-resolution close-up frame of the character from a successful primary render as your image input. Set the generator's motion strength or motion weight to a low value (typically 3 to 5 out of 10) and prompt for subtle facial movements, such as "subtle narrowing of eyes" or "a slow intake of breath," rather than dramatic head turns.



