
Simulating Vertigo: How to Write Precise AI Dolly Zoom Prompts That Work
Recreating cinema's most famous optical illusion in generative AI requires more than a simple zoom command. Learn how to construct opposing-vector prompts that keep your subject locked while the background warps flawlessly.
The dolly zoom—popularized by Alfred Hitchcock in Vertigo and famously executed by Steven Spielberg in Jaws—remains one of the most psychologically jarring camera techniques in cinematic history. By moving the physical camera in one direction while simultaneously adjusting the lens's focal length in the opposite direction, filmmakers can warp space, instantly conveying panic, revelation, or existential dread. It is a masterclass in visual storytelling that relies entirely on the physics of glass and mechanical movement.
Translating this mechanical optical illusion into generative AI video platforms like Runway Gen-3, Luma Dream Machine, or Kling is notoriously difficult. While these tools offer basic camera sliders, a true dolly zoom requires a delicate balance of opposing physical and optical vectors. At Montagea, we treat the AI not just as a text-rendering engine, but as a virtual camera rig that needs precise spatial instructions to mimic real-world cinematography.
The Physics of the Zolly: Why AI Video Engines Struggle with Dolly Zooms
A true dolly zoom (often called a "zolly") requires the camera to push forward while zooming out, or pull back while zooming in. This keeps the primary subject the exact same size within the frame while the background perspective shifts dramatically. When pushing in and zooming out, the background suddenly expands, revealing more of the environment and creating a sense of isolation. When pulling back and zooming in, the background compresses and rushes toward the subject, creating an claustrophobic, high-tension atmosphere.
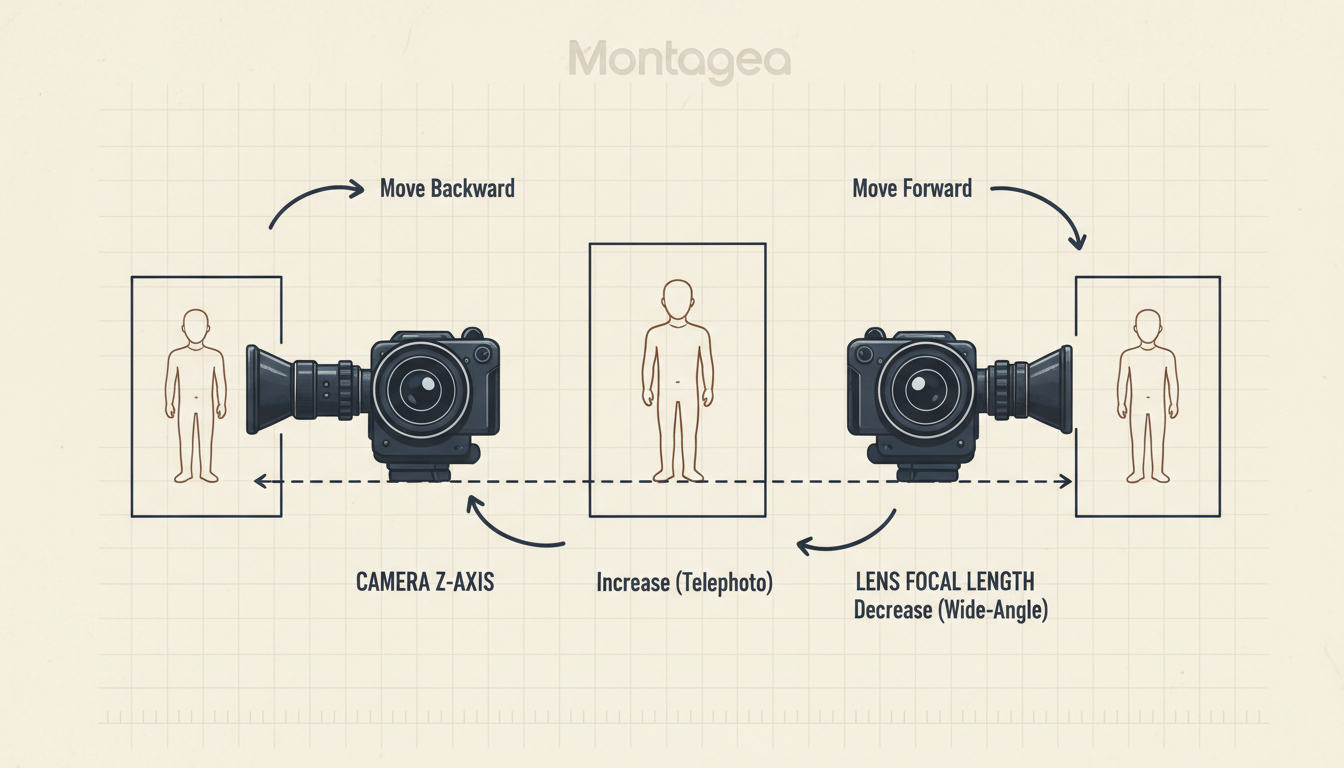
AI video generators do not natively understand physical optics, focal lengths, or three-dimensional camera rigs. Instead, they are trained on flat video frames and predict the next sequence of pixels based on pattern recognition. When you simply type "dolly zoom" into a prompt box, the AI model tends to collapse these opposing motions. It will typically default to a simple digital crop (a standard zoom) or a generic forward camera push. The background and foreground move at the same rate, completely destroying the perspective warp that defines the Vertigo effect.
To bypass this mathematical limitation, creators must prompt the AI to understand spatial depth, parallax, and foreground-background separation simultaneously. You have to force the model to render two conflicting pieces of visual data: a completely static, locked-in subject and a rapidly shifting background perspective.
The Anatomy of a Perfect AI Dolly Zoom Prompt
To trigger a successful dolly zoom, your prompt must explicitly command both the camera's physical movement and the lens's optical adjustment. If you leave either of these vectors out, the AI will choose the path of least resistance and generate a basic pan or linear zoom.
The core prompt formula relies on combining a static subject description with explicit, opposing directional vectors. For example, instead of writing "dolly zoom on a woman," you must write: "Camera physically dollies forward toward the subject while the lens zooms out wide, keeping the subject's frame size perfectly constant. Dynamic parallax shift, background expands dramatically, cinematic Vertigo effect."
To maximize your success rate, always include these essential cinematic keywords in your prompt:
- "Dolly zoom" / "Vertigo effect": Triggers the AI's learned association with classic cinematic references.
- "Crushed perspective" / "Background compression": Encourages the background to flatten and rush forward (for pull-out/zoom-in variations).
- "Dynamic parallax shift": Forces the AI to calculate different speeds of movement for the foreground and background.
- "Fixed subject scale" / "Locked framing": Instructs the model to keep the central character from shrinking or growing.
Why Image-to-Video (I2V) is Your Secret Weapon
While text-to-video (T2V) workflows can occasionally yield a decent dolly zoom, starting with an Image-to-Video (I2V) workflow is vastly superior. When you feed a high-quality reference image into Luma or Runway, you lock in the subject's initial framing, facial features, and position. The AI no longer has to invent the subject from scratch while simultaneously trying to calculate a complex camera move. It only has to compute the spatial transformation of the existing assets, resulting in a much cleaner, more stable visual output.
The 'Opposing Vector' Prompting Framework
To make this process repeatable, we developed the Opposing Vector Framework. This system breaks your prompt down into four distinct structural blocks: Subject Stability + Camera Vector + Lens Vector + Environmental Depth. By addressing all four components, you give the AI generator the exact spatial parameters it needs to compute the illusion.
| Movement Type | Camera Vector (Physical) | Lens Vector (Optical) | Visual Result | Prompt Formula Fragment |
|---|---|---|---|---|
| Push-In / Zoom-Out | Camera dollies forward along the Z-axis | Lens zooms out to a wide-angle focal length | Background expands, environment opens up, subject remains isolated but static. | "Camera physically pushes forward on a dolly track while the lens zooms out wide. The subject stays perfectly centered and fixed in scale, background perspective expands rapidly." |
| Pull-Out / Zoom-In | Camera dollies backward along the Z-axis | Lens zooms in to a telephoto focal length | Background compresses, walls close in, background rushes toward the subject. | "Camera physically dollies backward away from the subject while the lens zooms in close. The subject's size remains unchanged, background compresses and rushes forward." |
To make the dolly zoom feel truly convincing, the environment needs to have strong spatial indicators. The AI cannot warp flat, empty spaces. Always choose or generate environments with strong geometric depth. Use this checklist of environmental elements to enhance the parallax effect:
- Long hallways or corridors: Linear ceiling tiles and floorboards provide perfect perspective lines.
- Colonnades or rows of pillars: As the camera moves, the pillars pass the frame at varying speeds, creating intense parallax.
- Urban streets with towering buildings: High-rise structures emphasize the vertical compression of a pull-out/zoom-in.
- Subway tunnels or train cars: The repeating structural ribs of a tunnel dramatically warp during the optical shift.
Troubleshooting Common AI Dolly Zoom Failures
Even with a perfect prompt, AI video generators can frequently glitch due to the sheer complexity of the camera math. The most common failure is "background melting" or texture sliding, where the walls, windows, or landscape warp into a liquid-like state during the focal shift. To combat this, explicitly prompt for rigid architectural geometry. Phrases like "solid concrete walls," "rigid structural lines," and "no morphing, clean architectural geometry" will help keep the background stable.
Another frequent issue is character distortion. Because the AI is trying to calculate a rapid change in perspective, it often struggles to keep the subject's facial features and proportions intact. To prevent your subject from shifting sizes or losing their proportions during an aggressive dolly zoom, apply our production guide on maintaining character consistency across scale changes. This workflow ensures that your character remains a grounded anchor in the center of the frame, even as the environment around them warps.
Additionally, pay close attention to the subject's clothing. Rapid camera movements often cause the AI to hallucinate changes in fabric patterns, colors, or textures. Keep an eye on the subject's outfit during the focal shift; if the textures begin to warp, you can stabilize the clothing using our workflow for maintaining exact wardrobe details across scenes. By combining these stability techniques with precise camera prompts, you can achieve professional, studio-grade shots that are ready for the editing timeline.
Integrating AI Camera Moves into Professional Workflows
Once you generate a clean dolly zoom clip, your job as a filmmaker is to integrate it seamlessly into your edit. AI-generated camera movements are rarely perfectly timed out of the box; they may start too fast or end with a sudden deceleration. To fix this, import your clip into your non-linear editor (like DaVinci Resolve or Premiere Pro) and utilize speed ramping. Smoothly easing into the camera move and easing out of the tail end will make the AI shot feel like it was captured by a physical camera operator on a high-end set.
Furthermore, because AI video generators occasionally leave subtle artifacts in the background during high-motion sequences, you should apply standard post-production polishing. Adding a subtle digital depth-of-field blur to the background helps mimic a true shallow lens depth, which naturally masks minor AI-generated background artifacts. A touch of film grain and slight chromatic aberration across the entire frame will unify the generated pixels, making the final shot indistinguishable from real-world anamorphic footage.
Mastering these advanced camera-movement prompts is no longer an optional skill—it is a core requirement for the modern filmmaker looking to produce high-end, cinematic narrative work. By treating the AI as a physical camera rig and mastering the spatial mechanics of the frame, you unlock a level of visual sophistication that elevates your entire production.
How do you write a dolly zoom prompt in Runway Gen-3?
To execute a dolly zoom in Runway Gen-3, use an Image-to-Video workflow to lock in your subject. In the text prompt, describe the opposing physical and optical movements clearly. For example: "The camera physically dollies forward while the lens zooms out wide. The central subject remains perfectly static in scale and framing, while the background perspective expands dramatically. Cinematic vertigo effect, high-detail rigid environment." Avoid using simple camera sliders alone, as they rarely produce the correct opposing vectors.
Why does my AI dolly zoom cause the background to warp and melt?
AI models do not understand actual 3D geometry; they predict pixels based on patterns. When forced to calculate rapid, opposing perspective shifts, the AI can get confused, causing textures to slide or "melt." To prevent this, prompt for "rigid architectural geometry," "solid physical structures," and "no morphing." Using environments with strong, simple perspective lines (like concrete hallways) also helps the AI calculate the depth shift cleanly.
Can you do a dolly zoom with image-to-video generators?
Yes, and it is actually the recommended method. Starting with a high-quality initial image locks in your subject's features, clothing, and position. This allows the AI generator to focus its computing power entirely on warping the background perspective, rather than trying to generate both a consistent character and a complex camera move from scratch.
What is the difference between a digital zoom and a true dolly zoom in AI video?
A digital zoom simply crops into the image, scaling up both the subject and the background at the exact same rate, which looks flat. A true dolly zoom physically moves the camera closer or further away while optically zooming in the opposite direction. This creates a dynamic parallax shift where the subject stays the same size, but the background dramatically compresses or expands around them.



